Wednesday, April 28, 2010

Little Mini Cheesecakes

Mini is in. Mini cupcakes, mini cake truffles, mini skirts. Wait, are mini skirts in?? With leg warmers? Anyway, in the food world at least, mini is cool!! Like these little mini cheesecakes...


I made these for my brother-in-law's birthday without realizing that he loves cheesecake. Score one point for the sister-in-law!

The crust is your standard graham cracker + butter crust. I pressed it into a mini cheesecake pan. I also used a standard cheesecake recipe which was based loosely on THIS recipe from the Picky Palate blog . Without the pumpkin, obviously! And don't you love her blog header? Because I know I wear my black pumps when grocery shopping!! The cherry cheesecakes are plain cheesecake with cherry pie filling dolloped on top.


I actually split the batter and for the other half of the batter I stirred in mini (again with the mini!!!) snickers. And topped each one with a mini snicker.


Some of the snicker cheesecakes exploded in the oven. It wasn't pretty. I don't know if the caramel got too hot or what...but it wasn't pretty. I'm still cleaning caramel off my oven door. Notice i'm not showing those...hee hee!!


I think the cherry minis were the favorite, with the Snicker minis a close 2nd. While I love me some snickers, I still think these oreo cheesecakes were a bit better. Maybe something to do with exploded caramel.

I want to experiment with more flavors...any suggestions??? I was thinking Twix but I don't want another caramel mess to clean up. Maybe Thin Mint Girl Scout cookies? I wonder if I have any of those left in the pantry...

Thanks for stopping by!!
Monday, April 26, 2010

Wall Hanging

Hi and Happy Monday everyone!! It has been crazy busy around here. My sweet hubbie was gone for 5 days on a baseball trip which meant that I was here with the kids myself. We had lots of sporting events and birthday parties and stuff going on. It was fun, but busy! I even missed baking for my Sweet Melissa Sunday group. I just couldn't fit it all in.

Today I want to share a wall hanging I made for my office at work. The April 3 Scrappy Boys Trio kit came with a chipboard album that I turned into a wall hanging for my office.


I loved the shape of the chipboard pieces. For the first piece, I painted it with crackle paint and I like how you can see the embossing design from the chipboard through the crackle paint.


I made some accordian flowers with the paper from Kaisercraft in the kit. I just love these colors. Before scoring the paper, I used my threading water punch on one side of the strip of paper. I then scored between the scallops and brought it all together.


After getting the hang of these flowers, they are really fun!! I cut the flourishes out using my Cricut.


I used some of my latest favorite photos of my kids at the park. My daughter's hair is all over the place, but I love it anyway!! This was fun to put together and I really love those accordian flowers. They are pretty bulky and I shy away from putting them in my scrapbookings, but I do love using them for altered items.

Hope you all had a great weekend. Thanks for stopping by!!

Friday, April 23, 2010

Happy Friday Projects!

Hi Everyone!! Happy Friday to you all. It's a sunny, beautiful day here today and after the week of cold, wet, blustery weather...it's a very welcome change. We have lots of sports events and birthday parties this weekend and i'm looking forward to seeing some old friends. Woohoo!!

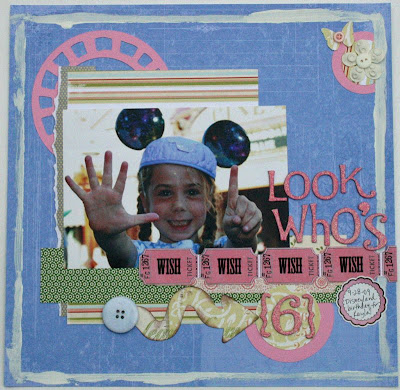
Now for the project part...here's another layout I did with the April Crazy Daisy kit. We took my daughter to Disneyland for her 6th birthday. You know...it's your birthday, get a day free??


I painted that outline on the blue background paper with acrylic paint. The kit also comes with an Exclusive digital download from the House of 3. See those pink tickets?? It's a very cool download! You print them out and use them as cute little embellishments.

The download is a whole sheet of these tickets with different words and colors. Pretty fun!!

And another card I made using scraps. I love the banner craze that is going on right now!


Everything is from the kit except the kraft cardstock and little letter stickers.


Thanks for stopping by today...have a great Friday!

Thursday, April 22, 2010

Happy Earth Day!!!

Happy Earth Day everyone! I hope you take a little bit of extra time today to Love Your Mother Earth and make sure you are taking care of this precious planet of ours. I try and i'm trying to teach my kids to respect the earth as well. And what better way to celebrate than to take what the earth gives us (wheat, sugar cane) and make a little earth love!


What? You can't tell what that is? Well, obviously...it's our earth!!


Yes? Can you see it? North America, South American...Europe?? Okay, i'm not the best artist and it might be a stretch...but I tried! LOL!! After attempting the earth, I went for something I could actually do. Marbled cookies!


It was so fun to play with three colors, so many possibilities!


I hope you have a very green Earth Day and remember to take care of this planet. It's the only one we have!! Thanks for stopping by...

There are no passengers on Spaceship Earth. We are all crew. ~Marshall McLuhan, 1964

Tuesday, April 20, 2010

Frozen Strawberry Pie

I am not really in the habit of making desserts more healthy. I mean, what's the point? I'm going to use real butter and lots of sugar and good stuff. Because life is short and that's what dessert is for. But my son found this recipe in my Prevention magazine and wanted me to make it. He reads everything. And I mean everything, he loves to read and picks up everything. Including all my magazines. And including all my books...which can be dangerous. Like when he asks me...Mom, what's a compromising position?? Hmmm...i'll save that story for another day. Prevention magazine has a column where it takes your favorite treats and makes them healthier. So I gave it a whirl!


Frozen Strawberry Pie
taken from Prevention Magazine, May 2010

Crust:
6 1/2 oz. vanilla wafers (about 3 cups)
2 tbsp butter, melted
2 tbsp canola oil

Filling:
8 oz reduced-fat cream cheese, room temperature
1/2 cup powdered sugar
1 pound strawberries, hulled

-Crush the wafers into fine crumbs. Mix crumbs, butter, and oil together.
-Pack the crumbs on sides and bottom of a 9 inch pie plate
-Chill at least 20 minutes
-Bake crust at 325 degrees F for 15-18 minutes. Cool Completely
-Beat cream cheese with electric mixer until smooth. Add powdered sugar at low speed and mix well.
-Puree one-quarter of strawberries. Fold into cream cheese mixture. Pour filling into crust.
-Freeze pie until just firm, 1-2 hours
-Take rest of strawberries and toss with a bit of sugar (optional). Serve this topping over the pie.


So...with that being said...I didn't follow the recipe. LOL! I chopped up about 3/4 of the strawberries and put them into the cream cheese mixture. I like all the red studded in the pink filling. And then I just put one big one on top!


I loved the intense strawberry flavor of the filling. It was so good. And we topped it with vanilla ice cream. It would be good with more strawberries, whipped cream, or ice cream!

And I am also in love with my new pie plate...I just love the color!!


I hope you are all having a good week!! Thanks for stopping by...

Monday, April 19, 2010

A View of Maui

Did you know that every Crazy Daisy kit comes with a mini album?? Are you into mini albums? Why or why not? I need to know, LOL!! I actually really enjoying putting mini albums together. I like that they are smaller projects, I can usually get them done quickly, and I feel like I really accomplished something. I am still trying to figure out how to display them. I have been looking for a basket or something for my living room so I can leave them out for people to pick up and look at. No luck yet...but that just means i'll have to keep shopping.

Okay...on with the show!! This month my Crazy Daisy kit included a rectangle album that included alot of pages. I thought it would be perfect to showcase some of my favorite photos from our Maui trip last year. All my Maui photos scare me...there are SOOO many! So I thought i'd face my fear head on with a mini album!!


I covered the front with paper and border stickers from the kit. I then added a big Hambly rubon and cut flowers with my Cricut to layer on top.


The inside pages are very simple. A big photo to take up the ends and a journal spot to say what the photo is about. I tried to put these photos in rough chronological order of the days of our trip, but I didn't stress about it. It's supposed to be just a View...


It was fun to get some of these photos actually scrapped. And right now I'm eating coconut creme Hershey Kisses so if I close my eyes real tight, maybe I can imagine i'm back on the island...drinking a Pina Colada...enjoying the sun...aaaahhhhh....

Thanks for stopping by today!

Sunday, April 18, 2010

SMS-Sweet Potato Bread with Cinnamon-Rum-Orange Glaze

Yes...it's Sunday again. More goodness from the Sweet Melissa Sunday cookbook. This week Lorelei from Mermaid Sweets picked the recipe and you can visit her blog for more information on the recipe. I was excited to try this (I think I say that every week!!) because I love sweet potatoes but never know what to do with them. This week...bread. But I will warn you...it's definitely MORE cake-like!


To be honest, it was a bit strange to have my house smelling like fall and Thanksgiving in April. The cake (I mean, bread) was delicious. Moist, dense, sweet...all of the above! This would make wonderful holiday gifts if you baked it in those individual loaf pans.

Now for the glaze. Oh the glaze, how I love thee!! I used Malibu Rum (because that's what I had) and the flavor blended nicely with the cinnamon. The glaze is a sugar/rum/orange juice/cinnamon stick blend that you reduce on the stove top before brushing it right on the warm cake (I mean, bread).


The cake (I mean, the bread) was delicious by itself. With the glaze, it was great. YUM! I made this Thursday night and when I came home from work on Friday...this is what I found.


Thank goodness my family left me a piece so I could photograph it!! My kids raved about this cake (I mean, bread). They loved it. I would definitely recommend it, I hope to pull this recipe out in the fall and make it again.

Check out all the SMS Bakers to see what they did with the recipe this week. Thanks for stopping by and have a sweet Sunday!!

Thursday, April 15, 2010

Papertrey Princess Challenge

I am lucky enough to be in a blog group with some amazingly talented stampers and scrappers and crafters. They are the Papertrey Princesses and I met them in the Papertrey Ink forums. We support each other by commenting on our projects and blogs and just being each others cheerleaders. I have met so many wonderful girls through this blog group. Thanks PT Princesses!!! Go visit their blogs (all the blogs are on my sidebar to the right), you will definitely be inspired.

Every couple of weeks we throw out a challenge for each other. I love the challenges, but can't always find time to complete one. But not this time!! Valerie gave us a Neutrals Only challenge...only black, white, kraft, cream...but no colors.

Here is my card:


I realized after the card was all adhered that the inner layer is actually smokey shadow color, not black like I thought. But when it's already glued down, you have to go with the flow!


I love to layer that butterfly and I added some silver stickles to the wings. The ribbon is some that I saved from a Christmas present wrapping and I'm so glad I saved it. It was the perfect colors for this challenge!


Thanks Val for the great challenge!! And if you ever need some stamping or crafting inspiration, check out the PTI Princesses. They will knock your socks off!

Wednesday, April 14, 2010

How I do Shabby

Hi Everyone!! I have some projects to share with you today that are a bit out of my comfort zone. The April kit from Crazy Daisy Kit Co. is a beautiful assortment of Webster's Pages, Tattered Angels, Dear Lizzy, Hambly goodies and more. It's very pretty and lovely and perfect for spring!! But it scared me. Just a bit. I am used to scrapping with bright colors and i'm not all that comfortable with shabby and vintage. But I am up for the challenge!! That's one reason I love scrapbooking kit clubs. You never know what you are going to get and it's fun sometimes to step outside your box. I think.

First up...my attempt at shabby and vintage with a touch of distressing!!

I did some paper tearing and dusted off my distresser for this layout. I even did some hand stitching!


I love love the butterflies in this kit, aren't they pretty!


I also liked the chipboard people in the kit, a fun detail!!


I cut all the flourishes and that big heart with my Cricut. This was fun to do something different!! My sweet hubbie surprised me with the Wild Card cartridge recently and I finally got a chance to play.


I just love this circle card cut. It's so cool and I wanted the cartridge just for this cut!


I used my Cricut cartridge alot for this card. I did a little bit of distressing, too. I have really enjoyed playing with this kit! I have more projects to come using the April Kit, including a mini album! So stay tuned...

Thanks for stopping by today!!

Monday, April 12, 2010

I Heart Desserts Photo Challenge

Hi Everyone! Happy Monday!! My friend Rebecca turned me on to this website called I Heart Faces Photography. It's a really fun photography site with all kinds of challenges...this week is a I Heart Desserts photo challenge.

I like that! Here is my entry:


My most favorite new chocolate chip cookie recipe...all nestled inside one of my favorite martini glasses. Ahhhhh, pure bliss right there! And guess who the guest judge is this week...Bakerella!!! You must go check out her latest and greatest Cake Pops. They are soooo stinkin' cute!!

Today is a short and sweet blog post. Hope you had a good Monday and thanks for stopping by!!

Sunday, April 11, 2010

Sweet Melissa Sunday-Chocolate Malted Layer Cake

Today's recipe for Sweet Melissa Sunday is Chocolate Malted Layer Cake. I was excited to do another cake, even though all week I debated between making cupcakes and making a cake. Cupcakes are easier to take to work to get rid of, but I do like baking a cake and all the details that come along with it. So...the cake won this week! Nicole of Sweet Tooth picked the recipe this week and you can check out her blog for all the details.


I did have some issues finding malted milk powder and the funny thing is I found it at my local grocery store. I was looking all over at specialty places. I did make some changes to this recipe:

-I made the malted milk chocolate ganache and filled the cake with it. I skipped the step about beating the ganache with butter since I wasn't frosting the cake with it. I just added a good thick layer of ganache between the two cakes.

-I used vanilla buttercream for the frosting. After tasting the ganache, I thought it would be tooooo much to cover the whole cake.

-I didn't use the coffee in the cake. I used hot water + unsweetened cocoa powder because I loathe coffee and didn't want to taste it in the cake. I know, I know...everyone says you can't taste coffee. But I wasn't about to chance it!


I am still in search of the perfect technique to achieve smoooooooth as silk sides to my cakes. I usually dip my spatula in hot water to try to smooth out the sides. Works pretty well, but it's not perfect.


All I have to say is WOW!! This recipe is definitely a keeper. The cake is amazingly chocolatey and moist. Thumbs up. The ganache filling is spot on with the malted flavor and was also amazing. Two thumbs up. And the vanilla buttercream is always yummy. If I had another thumb, it would be up. I took this to a birthday party and got rave reviews! Except from my husband, who announced halfway through my baking process that he hated whoppers and malted milk anything. Did it take us over 10 years of marriage for me to find this out???? So...he didn't even taste it. More for me...Ha ha!

Go check out all the other SMS Bakers this week to see what they did. Thanks for stopping by today!!

Thursday, April 8, 2010

Butterfly Kisses

Ah....spring. It's in the air...the warmth, the pollen, the wind. It just feels like spring! We had a big rainstorm on Monday and then nothing but pretty pretty weather this week. I love hiking this time of year. Despite my allergies, it's just plain beautiful. The plants are green, color is starting to poke out of the ground...ahhhh. Okay...now i'm starting to sound sappy. So i'll get to the good stuff...butterfly cookies!!


Aren't they pretty????


I used my tried and true sugar cookie recipe and played around with royal icing. I found the marbled icing idea from Bake at 350, one of my most favorite food blogs. If you haven't seen that blog yet, you must must must! It's amazing!! Another amazing blog is Sweetopia, she makes the MOST divine sugar cookies. Check that one out, too! She was guest blogging at Bake at 350 and shared her idea for marbling frosting. And it's so easy!


You basically pipe three lines of icing over the flooded icing and pull through it with a toothpick. Instant cuteness! Now, these aren't perfect. I'm still playing around with royal icing consistencies and how to outline the cookies before filling in the middle. But I loved the spring colors of these cookies and my daughter even made a few with me. After trying the marbling technique out for the first time, she was an expert!

Hope you are having some great spring weather. And if not, get into the kitchen and bake up a batch of cookies. They will definitely put a smile on your face!

Thanks for stopping by!!