I am starting something new on my blog today...Sweet Sunday!!! Every Sunday I am hoping to post a sweet recipe and maybe share some other sweet stuff.
Peanut butter and chocolate is my most favorite food combination ever. There are the classic combinations like apples and cinnamon or graham crackers and jelly...but there is something special about peanut butter and chocolate. I remember hoarding pb cups at Halloween as a child. Wait...I still do that. When I ran across this recipe at Vanilla Kitchen I just knew I had to try these! Suprisingly, I had never tried to make these on my own before.
For the first step, this recipe involves using a pastry brush to brush the insides of a cupcake liner in a mini cupcake pan with melted dark chocolate. The first couple I tried to paint didn't go so well. I was wishing I had just stopped at Target to get a bag of reese's on the way home! But I got the hang of it and the last 12 turned out great!! Basically you paint the outside with chocolate and let the layer harden in the fridge. Add PB mixture, let harden...add melted white chocolate, let harden...then cover to the top with dark chocolate.
Then really turned out great! I was nervous about getting them out of the wrappers, but the wrappers just peeled right off! And all the layers...wonderful!!! I think my next try will be to use milk chocolate for the outside layer. The dark chocolate was awesome but I think milk chocolate would be just as good. Here's the official recipe...
Dark and White Chocolate Peanut Butter Cups
recipe adapted from Vanilla Kitchen
12 oz bittersweet chocolate (60-70% cacao-no exceptions)
1/3 cup creamy peanut butter
1/4 cup confectioners’ sugar
1/4 cup crushed graham crackers
1 cup white chocolate chips
1. In a bowl, mix together the peanut butter, confectioners’ sugar, salt, and graham crackers.
2. In a double boiler, carefully melt the chocolate (set a metal bowl on top of a saucepan with boiling water).
Use regular or mini cupcake tins and line them with cupcake liners.
3. Using a pastry brush, brush the melted chocolate on the bottom and sides of mini cupcake liners; when in doubt, add more chocolate, since this will be the base for your candy. Place in the freezer for 10 minutes.
4. While those are in the freezer get out the peanut butter mixture and form into teaspoons or tablespoon balls depending on what size peanut butter cup you are making.
5. Remove the cupcake tins from the freezer, and place about one teaspoon (1 tablespoon for larger size) of the peanut butter mixture in each cup, make sure to put it in the middle, not touching the sides of the cup.
6. Spoon melted white chocolate on top of each cup, make sure to get filly in around the sides too. Harden the chocolate in the fridge.
7. Spoon dark chocolate over the top until the cup is full.
8. Place the peanut butter cups back in the freezer for another 15 minutes to set. Let them sit at room temp before devouring. Should make 12-16 mini's or 8 big ones.
Thanks for stopping by today!! I am excited about Sweet Sunday and I already have some recipes planned to try. Let me know what you think and if there's anything you might want to see. Have a sweet day!!
Pages
▼
Sunday, January 31, 2010
Saturday, January 30, 2010
Happy Saturday and Blog Candy Winner!!
Hi everyone! Happy Saturday!! I hope you are all safe and warm wherever you happen to be today. There are supposed to be some wicked storms hitting the US today, gladly I will not be part of them. It's sunny and beautiful today for us, one advantage of living in California.
I want to say thank you to all the wonderful bloggers who came to check out my blog this week!! I am in the process of visiting you all, I love being inspired by all the crafty people out there. And not just scrapbooking, I love all kinds of papercrafting, baking, sewing...you name it. There's always something to inspire me out there. Now, without further ado...here's the winner!!
The Random Number Generator (which I cannot figure out how to post here on my blog...ugh!) picked #11... and that is Mama Tuttle (Andrea)!!!!!! Andrea, please email me your address and i'll get your candy out to you ASAP! And while you are here, check out Andrea's Blog...she's a great papercrafter!
I'm going to leave you with a few sneak peeks of some of my Croppin' Paradise projects. You might agree they might give you a little bit of a Sugar Rush...hee hee!! And please stop by the Croppin' Paradise blog, they are giving away some NEW CHA releases and you don't want to miss that!
Thanks for stopping by!!
Thursday, January 28, 2010
Jugs Challenge #17
I think I squeaked this challenge in under the wire! JUGS challenge #17 is a template challenge.
I went to Lauren Meader's new website, My Time Made Easy and bought her Shutt-erfly template. They are so reasonably priced and can be used over and over again. I love her templates!! Here is what I came up with. It's also for a Scrappin' Mojo challenge to use red, white, blue, and pink on a project.
I added a bit of pink right in the middle of the layered flower. I cut those flowers out on my Cricut, using my Accents Essentials cartridge. I also cut the scalloped squares from that cartridge.
All of the paper and stamps are from Papertrey Ink. I also made a tag for the template but couldn't figure out how to attach it...so I turned it into a card!
I had lots of fun making this...even though I did have some problems with the top enclosure. My sweet hubby had to help me close it and figure out the folds. He is really good at stuff like that! Thanks for stopping by today...can't wait for Friday...last day of work for the week. I like that!
Tuesday, January 26, 2010
Blueberry Streusel Scones
I was in the mood to make something with blueberries this weekend. Maybe blueberries remind me of summer and it was actually sunny out this past weekend. So I hunted around the internet for a while and finally decided on THIS recipe from the Joy of Baking website. I actually followed the recipe and they came out perfect.
I used frozen blueberries, because I had no fresh ones. The topping added a nice little sweet crunch without being too much.
I ate one fresh out of the oven, when it was still hot. It was delicious. The rest I sealed tight in a lock and lock tupperware and stored in the fridge for breakfast the next morning. After heating them up for 30 seconds in the microwave, they were still delicious. I was worried they would get stale and soggy with the topping, but nope!! Just plain yummy.
My son loved cranberries and asked if I would make some cranberry scones next time. I think that would be good, too. Put that on my list of things to bake soon!!
Thanks for stopping by!!
Monday, January 25, 2010
January PTI Blog Hop!
Yeah!! It's Blog Hop time!!
I haven't had the time to participate for the last couple of months, but January is here and I am ready!!! This month we had to decorate our card not only on the outside, but also on the inside. Here is what I came up with.
I used Kraft cardstock with Smokey Shadow, Raspberry Fizz and some random white I had lying on my craft desk. I am still in love with Polka Dot basics and I also used an image from Love Songs and the sentiment is from the first Button Bits set. I also added some random ribbon and BG Bling to the front. Now...to the inside!!
Since the paper is dark and my favorite white pen just ran dry, I needed someplace inside to add a nice handwritten note. So I replicated the outside colors inside, along with my apron lace border punch and some more BG bling. And I was SO crazy I even decorated the envelope!!
There is my simple entry for tonight's blog hop! Thank you so much for visiting my blog, I am looking forward to being inspired by you all tonight!!! Happy Monday!
Saturday, January 23, 2010
Anybody want some Candy???
***Blog Candy is now CLOSED. Thank you to everyone who came by to check out my blog!! Winner has been posted***
Happy Saturday everyone! We had a break from the rain today and it's been sunny and beautiful. Not really warm, but warm enough. We went geocaching this afternoon, took a family bike ride and went to get frozen yogurt after. It was SO nice to be out after all the rain this week!!
Today, I am offering up some blog candy!! I have met SO many wonderful crafty people through this blog and I am SO grateful for all the wonderful comments that you all leave. You really know how to make a girl feel good. I appreciate every comment you leave and I truly enjoy all the great friendships that have resulted from this blog. Can I get a group hug????
Here's what you will get:
6x6 paper pad Marrakech from Basic Grey
1 chipboard flower album by Maya Road
Sprinkles and anchorettes by Queen & Co: You Go Girl collection
Inspiration-Bliss rub-ons by Maya Road
Alphabet Rub-ons by Fancy Pants and Jenni Bowlin
Jar of blue flowers by Prima
1 Pink Paislee Pixi Stick in Green Apple
All you have to do is:
Leave a comment on this post. Easy peasy!! And I would also love if you became a follower of my blog. That makes it easy for me to find you and check out your blog as well!! You will have until next Friday...January 29th...to leave a comment on this blog post. I will draw a winner next weekend.
I hope you are having a great weekend. Thanks for stopping by!!!
Thursday, January 21, 2010
JUGS Challenge #16
Hi Everyone!! It's a super wet Thursday for us. It's been POURING all week. Yesterday we had some pretty loud thunder and the kids were a little bit freaked out at school. Supposed to rain all week, so while it's cold and wet outside...i'm getting crafty inside!
Here is the JUGS challenge this week...it's a color challenge.
These are so pretty together, I just love the combo. I used papers from Papertrey Ink, scarlett jewel, white, spring blush (I think??) and smokey shadow. The stamps are also from Papertrey Ink.
I love that big flourish stamp. I added some jewels to the flourish and aroundt he sentiment. I love the Mega Mixed messages set from Papertrey, there's a sentiment for every card in that set!
I really enjoyed these colors, they will definitely be a great combo for future cards. I hope you are having a great week. We are braced for more rain today and tomorrow. Just makes me want to stay home and craft and bake. Maybe i'll try a new recipe...hmmmmm..!!! Thanks for stopping by, friends!!
Tuesday, January 19, 2010
Mini Oreo Cheesecakes
Last week, I had a chance to play with my new mini cheesecake pan that I received for Christmas. The first recipe I wanted to try was Mini Oreo Cheesecakes. I've had this recipe in mind and was hoping to get that pan for Christmas. My sweet hubby was the one who got it for me. It's a win-win for him...happy wife and mini cheesecakes in the fridge!!
Mini Oreo Cheesecakes
3 8oz packages of cream cheese, softened
3/4 cup sugar
3 eggs
1 package oreo cookies
4 tbsp butter
mini cheesecake pan
-Crush up 16 oreos. I did this with my Pampered Chef hand nut chopper, but you could use a rolling pin or your blender or your fist. Melt the butter and combine the butter and oreos. Grease the pan well. Add a spoonful of oreos to the bottom of each well and press down. This is enough crust to make 16 mini cheesecakes.
-Mix the softened cream cheese and sugar until well blended. Add the eggs one at a time and blend well after each addition.
-Crush up about 20 oreos and add to the cream cheese mix. You can add more or less, depending on how much you like.
-Spoon mixture into the pan
-Bake at 350 degrees for 15-20 minutes
-Remove from oven and let cool for a little bit. Take the cheesecakes out of the pan and place in refridgerator for at least 1 hour.
You might have more filling for more cheesecakes. If you have any oreos left after popping a bunch in your mouth while the first batch was cooking (you know you will!!), you can make more crusts. I then melted some chocolate candy melts to drizzle over the top.
I adapted the recipe from a few on the web that I found, I just changed it up to fit my pan and my tastes. These were very very good. Very chocolately and oreo-like, I loved them. My hubby even liked them, and he's not a super big oreo person. You could even eliminate the oreos from the filling if you would rather have a plain cheesecake with oreo crust. My kids gobbled up their portion and asked for more. Although that always happens with dessert, so not sure if it was a compliment or not. Hee hee!!
I love my mini pan!! I was thinking of all the cheesecake possibilities, the first one being chopped up snicker bars in the filling. Or plain with a fruit topping. I can't wait to make more! Thanks for stopping by!!
Monday, January 18, 2010
It's a Rainy Monday
Happy rainy Monday! The kids and I have today off for Martin Luther King day and it's pouring rain. Really pouring rain. We are supposed to get over an inch this afternoon with thunder and lightening. It's a good day to stay inside and craft!!
I wanted to share some exciting news I have today. I am now part of the Croppin' Paradise Design Team!! They are a great store that carry some of the latest and greatest paper lines and embellishments. I am very excited to be part of this talented design team. Come on over and check out our forum, we have some really fun crops and challenges coming up that you will not want to miss!!
Here is a quick layout I did using a sketch from Stuck Sketches. I've been scrapping photos from last summer lately, it's been a fun change from doing Christmas projects. This layout I used a summer kit from Color Me Daisy that featured Lime Rickey papers from Basic Grey.
Just a fun summery layout of my daughter and her best friend from Kindergarten. I made that layered flower on the Cricut and used paints and lots of stickles on the acrylic butterfly.
Hope you are having a good Monday and that your weather is better than ours today. Although we do need the rain, so in a way it's good. Not so easy to get in my runs with it pouring outside! Thanks for stopping by...
Friday, January 15, 2010
Year in Review 2009
At the end of the year, there were lots of favorite lists going on in the blogosphere. Favorite layouts of the year, favorite recipes, favorite songs, favorite moments...I could go on and on!! While I didn't get to that on my blog, I did decide to make a year in review layout. I've been interested in photo collages for some time, now that I have photoshop. I downloaded a few from Scrapbooks Etc., but it wasn't working for the whole year in review concept in my head. I wanted LOTS of photos on my layout!!
So...I played around in photoshop a bit. I picked out a bunch of my favorite photos from 2009 and resized them all to 1 inch x 1.5 inches. I then opened a blank 8x10 template and dragged all my little photos onto the template. It took me some time to get them all arranged how I liked, but they eventually all fit. I saved it as a jpg file and then got it printed at Costco. And I love how it turned out!!! Here's the layout I did with the collage...
From the top left corner, it goes through the year and I tried to touch on our highlights for 2009. And the page just needed a few embellies to dress it up.
I also added strip journaling and I tried to touch on important or memorable things we did over the year. I know I didn't hit it all, but I think I got quite a few of our favorite things! I was totally inspired by Laura Vegas and her layouts using photos collages. After making the collage, the layout itself took me about 10 minutes to put together. This is definitely something I will be doing again. Maybe even go back and do it for previous years, if i'm feeling sassy. Hee hee!!
Happy Friday to you all!! I am headed to a scrapbooking expo tomorrow with some friends and i'm super excited about that. I hope you all have a fabulous weekend and thanks for stopping by!
Wednesday, January 13, 2010
JUGS Challenge #15
Happy Wednesday! We got some much needed rain today and while it didn't stick around too much, it was a refreshing change. I have another Just Us Girls Challenge for you today. This week was a technique challenge and it was the dreaded stitching challenge!! Don't get me wrong, I love the look of stitching on projects. I just can't do it. I don't have a sewing machine and my hand stitching always looks like it has been done by a 1st grader. I think my daughter could do a better job!! Anyway...on with the show...
I decided to make a little hostess gift this week. This is the Around the Town template from Papertrey Ink, the mini version. You'll see that I stitched around the matting for the challenge.
I found my paper pack of Urban Prairie papers by Basic Grey. I've been hoarding it so well I forgot I had it, LOL!!! The patterned paper is from that pack and the cardstock and polka dotted paper are Papertrey Ink.
The sentiment is Papertrey Ink, too. I forgot how I don't like to stamp on textured cardstock because I can't seem to get a clean stamp. But I always stamp at the end of my project, maybe I should start stamping at the beginning of my project? LOL!
Here's a closeup of the butterfly. Absolutely my favorite Cricut cut on my Indie Art cartridge!
I inked around the edges with white ink and added some gems to the wings. I love this butterfly!!
Okay...that's what I have today! I would highly recommend checking out the JUGS challenges. They are great and the DT always have fantastic examples!! I hope you are having a fabulous week. Thanks for stopping by!!
Monday, January 11, 2010
Kevin's 8th Birthday Party
Wow, we had a great birthday party for my son this weekend!! His birthday is the day after Christmas and we postpone his big party until January. And the weather always seems to cooperate, it was in the high 70's with a big blue sky on Sunday! And I have lots of photos to share...so be forewarned! Hee hee!!
First...the goodies. This is his alligator cake he has been wanting for over a year now!! I found the idea in my Hello Cupcake recipe book.
And since we were having a 'bird show' at his party, I made owl and vulture cookies for the kids goodie bags. Lots of piping with royal icing, I had forgotten how fun that was!!
We had a big jumper slide in the backyard and the kids still loved it. And Kevin made homeade root beer with Dad and also kegged it. Way cool to be a 8 year old and pour your own pint!
And here are the stars of the show!! First...a beautiful Peregrine Falcon. Kevin even got to hold this guy!
And then Periwinkle the owl. This guy was the COOLEST EVER!!! His eyes are mesmerizing and the way he swivels his head is so cool! Everybody had a chance to pet this bird.
And then...there was one more crate. A wooden box that was literally shaking off the ground. The kids were dying to find out what was in it...and it was Dexter the Vulture!!!
This bird was pretty cool, too!! He was a fiesty one, he kept trying to eat Joe's watch and pulled off his sunglasses and pretty much flapped his wings alot and made a big fuss. Pretty cool to watch! I think even the adults had a great time with the birds. And I honestly think this bird is probably bigger than my daughter.
Thanks for making it through all these photos. They were just too good not to share. The weather was amazing and all the kids were so well behaved and polite, it was just a great party. I sure hope you enjoyed your weekend!! I have lots of crafty stuff planned this week, so don't forget to come back!
Thanks for stopping by!!
Saturday, January 9, 2010
Happy Saturday
Hi everyone! Happy Saturday!! We are busy busy busy getting ready for my son's birthday party tomorrow. That means cleaning the house and the yard, making cookies and cupcakes, getting party games finalized, etc! We are having a large number of 8 year olds over tomorrow. Thankfully the weather is supposed to be beautiful, so they can all play outside.
While i'm taking a break from frosting and pine-sol (not together, mind you), I wanted to share one more layout I did using the January Homeade Treats kit from Color Me Daisy. My sister and my daughter share such a special bond. They are so alike and love to hang out together. My sister is an amazing aunt and I'm SURE will make an amazing MOM too!! She is set to have twin girls in about 8 weeks and I could not be more excited!!
I don't usually use green on layouts, but I really loved the green in this kit. The bottom layer of the lollipop flowers are notebook paper that I 'borrowed' from my daughter's backpack. Just used my punches, scrunched, inked, then layered. I love making these flowers!
Hope you are having a great weekend. I will be back on Monday (hopefully) to share lots of photos of the goodies i'm making and the party. If I survive!! Ha ha!! Thanks for stopping by-
Thursday, January 7, 2010
Cream Puffs
I am basically a fly-by-the-seat-of-my-pants baker. I like to use a recipe, but I don't always check to see if I have all the ingredients. And if I don't have something, most likely i've already mixed up half the batter, so I tend to improvise a bit. Cakes, cupcakes, breads, muffins, I love making them all and they seem to be okay with my non-exact baking practices. I make a mean pie crust, but that is the extend of my pastry baking experience. I've always been a bit scared of pastries, because they seem more 'exact'. With that in mind, I decided to try making cream puffs!!!
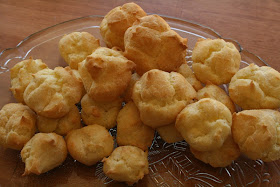
I found a great recipe here, at Our Best Bites. There was also a tutorial, which was super helpful. I mixed up my batter and dropped teaspoons full on my cookie sheet. And the actually did puff up in the oven, amazing!! I also tried dropping the batter with a normal spoon and that worked too, and they were a bit bigger. I think I liked the bigger ones.
Now I had big plans to fill them with bavarian cream or chocolate mousse, but time ran out. So I made some fresh whipped cream (whipping cream + sugar + kitchenaid mixer = yummy!) to fill them up. I cut off the top of each puff.
I dug out the inside if there was too much dough and I added a big dollop of whipped cream.
Then topped it off again.
Now, it's time for embellishing!!!!! I found some leftover chocolate ganache in my fridge and went to town with that and some powdered sugar.
Oh, aren't they pretty!!!
I think in the end I liked the smaller ones the best. You could just pop one in your mouth and forget about the calories you just ate and then pop another one in your mouth. Repeat. Over and Over. I brought these to Christmas dinner and I think they were a hit! When I have more time, I definitely want to play with fillings. Imagine bavarian cream or mint chocolate mousse or espresso ganache or...or...so many ideas, so little time!!
Now i'm a little bit less afraid of pastries. Thanks for stopping by!!!