Pages

Monday, October 31, 2011

Holy cow...Top 5!!

I am excited and thrilled and shocked to say that I made it to the Top 5 of the Practical Scrappers card contest!! There have been so many wonderful cards displayed over the last few weeks. Thank you for all your votes so far, they are so appreciated! I seriously never thought I would make it this far.

This week we needed to create a card using a rainbow as inspiration and that included dry embossing. I pulled out all my Papertrey Ink cardstock colors and started pulling what I needed to complete a rainbow. I don't have any embossing dies, so I decided to use my Scorpal to create score lines as my background.


I punched 1 inch circles from all the cardstock colors and made rolled flowers for each rainbow layer. I painted stickles inside each flower for a little bit of glitter and shine. And I couldn't resist adding some baker's twine!


Now is your chance to head over to Practical Scrappers and check out the other amazing top 5 cards. Each one is wonderful, I really loved seeing what everyone did with the rainbow inspiration this week. Don't forget to vote for your favorite!!

Thanks for all your support and for stopping by today!! Happy Monday!

Saturday, October 29, 2011

Pumpkin Chocolate Chip Bars

Happy Saturday! I have a delicious, quick, easy recipe to share today. Tis the season for baking with pumpkin and this recipe brings together 2 great flavors, pumpkin and chocolate. It's an easy one-bowl one-pan recipe.

 
These are moist, dense bars with bits of chocolate throughout. I love the pumpkin flavor and the chocolate really kicks it up a notch. It is a great flavor combination.


If you eat these right out of the oven, you will be treated to warm, dense cake and melted chocolate all over your fingers. If you let them cool, cut into squares, and bring to your favorite pumpkin carving party, you will be treated with compliments and requests for the recipe.


Please head over to the Two Peas and Their Pod food blog for the easy recipe: Pumpkin Chocolate Chip Bars.  The hardest part about the recipe is remembering to take out the butter and let it come to room temperature. Make them for your next fall get together today!

Thanks for stopping by today, have a great weekend!!

Thursday, October 27, 2011

You Are So Sweet

Have you voted yet? In case I hadn't mentioned it, I'm in this card contest over at Practical Scrappers. And I need your vote. Please head over to THIS POST to vote for your favorite card.

In the meantime, here's a little card to show my appreciation for all your votes!


So yummy Bo Bunny papers, ribbon, bling and a fun doily. Do you know where I get all my doilies? The cake/baking aisle at Michael's. They have packs of 30 for $2.99. Now that's a steal.


Thanks for all your votes, I truly appreciate them. And...Yeah for tomorrow being Friday! Thanks for stopping by, friends.

Tuesday, October 25, 2011

S'mores on a Stick

So...what do you think? Of my new blog design??? The fabulous Kristine Davidson designed the header for me and helped me with the redesign. I am very happy with the results, thanks Kristine!!

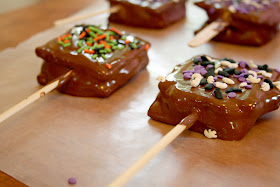
And next...what the heck is a S'more on a stick? Well, it's two graham crackers, chocolate, marshmallow all dipped into chocolate and served on a stick. Does it get any better?


Here they all, packaged up to take to a fun Oktoberfest party. And i'm going to show you how to get to this packaged point.

What you will need:
1. Graham crackers
2. Hershey chocolate bars
3. Big marshmallows
4. Chocolate for dipping
5. Sticks
6. Sprinkles for decoration

First, assemble your s'more using one big marshmallow:


Put this in the microwave for about 10 seconds. The marshmallow will get all gooey. Press the two crackers together and smash the marshmallow. Push your stick into the gooey marshmallow. Line them up on a cookie sheet or cutting board and put in the freezer for at least 30 minutes. 
Melt your dipping chocolate. After taking the s'mores out of the freezer, dip each pop into the chocolate, coating them completely. I had to use a spoon and spoon chocolate over some of the parts that didn't get dipped. After dipping, place them on waxed paper. Then decorate with fun sprinkles. Look at these sprinkles...fun halloween colors and in test tubes? So cute!

Here is the finished product!


I used popsicle sticks for some of them and bbq skewers for some. I prefer the bbq skewers, but both worked just fine!
I had to place them in the fridge to get them completely set. I then packaged them in cellophane bags and they were ready for the party!


These were a great project for the kids, too. They had a ball putting together the s'mores and decorating with the sprinkles. And they were a big hit at the party. Delicious and festive! You could customize these for any type of occasion, birthday, halloween, Christmas, baby showers...the list goes on.

S'mores on a Stick...try them today. A shout out goes to Tidy Mom for giving me the great idea. Thanks for stopping by today!.

Sunday, October 23, 2011

Top 10!!

I was so excited to learn this weekend that I made it to the Top 10 in the Practical Scrappers card contest!!! And I want to thank all of you for voting for me, I really truly appreciate every vote. So thank YOU!

This week's card was really difficult for me. It needed to include a chevron pattern and stitching. I searched through every single piece of patterned paper I had for something with a chevron pattern. Eventually I found some scraps that were shoved way at the bottom of a bag. Thank goodness for scraps!! And stitching is something I rarely do. So, with my chevron scraps and a needle and thread, I created this card.


I had that one green strip of paper with the chevron pattern. I paired it with some other patterns from the same collection, Oliver by Basic Grey. I also added some non-traditional stitching on the tag.


I used my circle punches to create this 'flower'. I used my scissors to cut into the circles and then sorts fluff up the flower petals. 


Please head over to the Practical Scrappers blog and you can check out all the cards in the top 10. At the end of the blog post there is a poll for you to vote for your favorite. So please check out all the beautiful cards and then cast your vote. Easy peasy!!

I hope you all had a great weekend. Thanks for stopping by today!

Friday, October 21, 2011

Ain't nothing but a Bling thing

Happy Friday everyone!! It's been a long crazy week and i'm very happy it's Friday. I have a quick share today. It's a card I made for the Scrapbook Express blog challenge to use bling. Why, yes...I think I will use some bling.


These are papers from the Hometown line by Pink Paislee. I tried to focus on the greens and blues in the paper and I really love this card turned out. The bow is sitting just right, I love when they do that. Sometimes I spend 15 minutes trying to tie a darn bow, but this time it came together so nicely. And that big bling swirl...LOVE!


Thanks for stopping by today! I hope you all have a fabulous fall weekend!

Tuesday, October 18, 2011

Candy Corn Sugar Cookies

Who likes candy corn...raise their hand. For me, it's not my favorite candy. Give me some chocolate or a peanut butter cup or some swedish fish. But not candy corn. But some people LOVE it. I mean, really really love it. I've seen lots of candy corn treat recipes lately but these really caught my eye. They were so much fun to make!!


The recipe is a basic sugar cookie dough which is then divided into 3 sections. One section is colored orange. Using a loaf pan, you layer white dough, orange dough, white dough. What you end up with is something that looks like this.

 
Slice a piece off the end, and then start cutting triangles.


Bake for 7-10 minutes and then cool. How cute are these little cookies!


I then melted some white chocolate and dipped the big end in yellow sugar sprinkles. And then they look like real candy corn.


I really loved making these. And they are delicious, little bites of sugar cookie with white chocolate and sprinkles. These would look great on a platter for a Halloween party or on a cookie plate for a neighbor! 

Thanks for stopping by today!!


Sunday, October 16, 2011

Round Three!!!

Hi Everyone! Thanks to YOUR votes, I made it to Round 3 of the Practical Scrappers card contest!! Can I get a whoop whoop??!! This week our challenge was to make a card using flags or banners and using the word happy. Here is my card...


The paper is Pink Paislee Hometown, I just love the bright colors. I cut the doily on my Cricut with my SCAL software. I got the svg files free at My Grafico. The round stamp is from Papertrey Ink.


I made the flags but cutting scraps and wrapping them around decorative stick pins. I then added a bit of baker's twine!


Thanks so much for all your votes, I appreciate every one of them! Now...I get to ask you again. Please go HERE at Practical Scrappers to check out all the cards this week and vote for your favorite. And you CAN vote every day this week!! 

Hope you're having a great weekend!

Saturday, October 15, 2011

Pumpkin Cream Cheese Muffins with a Streusel Topping

I love sweet breakfast. Okay, I do enjoy good scrambled eggs every once in a while but sweet breakfasts are where it's at. Pancakes, waffles, cinnamon rolls, blueberry muffins...all winners in my book. And these sweet muffins are a great fall way to start your breakfast. Maybe not every morning, but they sure are a nice treat.


The recipe I used called for pecans in the topping but I didn't have any on hand. But I'm sure they would be a great addition to the sweet and crunchy topping.

Now wait a minute. Where's the cream cheese? It's a fun little surprise inside the muffin and believe me, it's absolutely the best part!!


These are a great way to start the day, especially if you have a breakfast sweet tooth like I do. Do you prefer sweet or savory breakfast?

Please head over to the Brown Eyed Baker's blog for the recipe: Pumpkin and Cream Cheese Muffins.


Thanks for stopping by, have a great Saturday!

Thursday, October 13, 2011

More Hayrides and Halloween

I have a few more projects from the October Citrus Tree Studios kit, Hayrides and Halloween. I really had fun playing with the mistable ribbon and the October Afternoon Sprinklers mist. I think I finally might like mists!


I took a long strip of the mistable ribbon and started twirling/pleating it in my fingers. Along the way I added dabs of fabric glue. When the ends came together, I had some fun flowers.  I then misted the flowers, added button centers and added them to my page!


I really loved that devil costume my daughter wore last year, so appropriate. LOL!!


And I also made some fun Halloween tags this year with the Add-on stamp set. I loved this little bunny all dressed up!


These will go on our neighborhood Boo Baskets this year! That is something I hope to get done this weekend. My kids love the boo-ing tradition. If you don't know what boo-ing is, check out this. We've done it every year since we moved and it's so much fun.  


I hope you're having a great week so far!! In case I haven't already mentioned it a million times, I am in a card contest...and you can go HERE to vote for me!! Even if you already voted this week, you can vote again.

Thanks so much for stopping by today!!

Tuesday, October 11, 2011

Cookie Dough Toffee Dip

Thank you to everyone who voted for my card!! You can continue to vote all week, even if you already voted. Please go to THIS POST for all the information and a look at my card!

Now, on to the good stuff. The really really good stuff. I always like to bring something new to my bunco group. We are a group of 12 who get together once a month to play bunco and chat and eat. We mostly chat and eat, let's be serious. This month I really wanted something different and I've seen Cookie Dough dip on a few different sites. So I combined a few of the recipes I found into this one...Cookie Dough Toffee Dip.


Oh my, this is not for the faint hearted. It's chocolate chip cookie dough with toffee bits in a smooth dip. It's amazing. It's fantastic. It's the reason stretchy waistbands were invented, i'm sure of it. 


I served it with graham cracker sticks, pretzels rods, animal cookies and vanilla wafers for dipping. The cute graham cracker sticks were by far my favorite to use for dipping. Although the vanilla wafers were a close 2nd place!


This is best made and shared with friends and family, because having a whole bowl of this in my fridge might lead me to be permanently wearing those stretchy waistband pants.

Cookie Dough Toffee Dip
adapted from My Kitchen Cafe

8 ounces cream cheese, light or regular, softened to room temperature
1/2 teaspoon pure vanilla extract
1/2 cup powdered sugar
1/2 cup packed light brown sugar
3/4 cup mini chocolate chips 
3/4 cup toffee chips

1. Add cream cheese, vanilla extract, powdered sugar and brown sugar in a bowl. Mix very well until smooth.
2. Add chocolate chips and toffee chips. Mix well.
3. Serve with your favorite dipping utensil. This may or may not include a spoon.

If you find it too runny, add some more powdered sugar. Serve at your next get together and watch it disappear.

Thanks for stopping by today!

Sunday, October 9, 2011

Hello Fall and a Vote

Happy Sunday! It's a beautiful fall day here today. It's sunny but a bit crisp outside, the weather was absolutely perfect for soccer games yesterday. Even though summer is my first love, I have to admit I am liking the cooling down. We got all our fall and Halloween decorations out this weekend and have been slowly decorating the house. Now to decide what we are all going to be for Halloween!

I have a fall card to share today, made with parts and pieces of the October Citrus Tree Studio kit.


The 'b' sides of the American Crafts papers in the kit have a great fall feel to them. Pretty oranges and blues to work with. I added a tag with my sentiment (those alphas are from the kit, aren't they fun?) and some orange ribbon and twine!


And I couldn't resist rolling some paper flowers...

 
And here is some fun news...I made it to round 2 of the Practical Scrappers card contest!! And this Fall card is my entry for round 2. If you have a chance to check out all the entries, please go here: Practical Scrappers Round 2 cards. If you like my card, I would love to have YOUR vote!! You just need to leave a comment with my name in the comment section. And you can vote EVERY day this week, so bookmark the site and go back everyday to vote.  I would really appreciate your vote if you like my card. Thanks so much!

Thanks for stopping by today. I hope you all have a relaxing Sunday!

Thursday, October 6, 2011

Hayrides and Halloween

It's the first of the month and you know what that means...new Citrus Tree Studio kit! Hayrides and Halloween is perfect for all your fall and Halloween pics and projects. I loved playing with this kit. My favorite thing?? The mistable ribbon and the October Afternoon Sprinklers mist. So much fun to play with.


I've always been a little bit afraid of misting, but I loved this stuff. It was easy, sprayed well, and dried so quickly. And I quickly became addicted.


Look at that fun ribbon! I added some texture by pleating it and adding it to many parts of my layout.


There are so many fun elements to this kit. I had a ball scrapping these older Halloween photos.
Hope you are all having a great week so far! Thanks for stopping by...

Tuesday, October 4, 2011

Bottlecap necklace tutorial

I enjoy making little unique gifts to put in my children's goodie bags for birthday parties. As they get older, they grow out of the little plastic toys that usually come in goodies bags. For my daughter's party, I wanted to make something that would be unique for each of the girls but still something that tied them all together. Does that even make sense? Anyway, I've wanted to make bottlecap necklaces for a while and this seemed like a great opportunity.

Here's what you need:
1. unused bottlecaps (my hubbie is a homebrewer, so we have tons. You can get them off etsy or the internet)
2. mallet for smashing
3. heat gun
4. small images or fancy paper for inside bottlecap
5. Dimension Magic (or possibly Glossy Accents?)
6. tiny drill bit or nail/hammer
7. cord or chain for hanging (from Michael's)
8. jump rings (from Michael's)
9. something for cutting 1 inch circles (die cut machine, punch, etc.)
10. Mod Podge

First, smash your bottlecaps using the mallet. I put the bottlecaps on my cutting mat and smashed them while the mat was on the floor.


Then using your heat gun, heat up the seal inside the bottlecap. When heated, the seal becomes soft and you can pull or scrape it out of the bottlecap.

Using my Cricut, I cut a 1 inch circle from white cardstock. I stamped my image and colored with watercolor pencils.


Using mod podge, adhere the circle inside the bottlecap. Let this dry completely.


Add the dimensional magic to the bottlecap. Fill it up all the way and make sure there are no bubbles.


A few ways to insure no bubbles are to store the bottle upside-down before using it. Also, squeeze out a tiny amount of liquid in the bottle onto a spare piece of paper to get all the bubbles out of the tip. If you do get a bubble, pop it quickly with a safety pin or something sharp.
The dimensional magic will appear cloudy. Let this dry for at least 24 hours. And this is when I started having problems. Turns out the ink and the watercolor pencils smeared and yellowed when the dimensional magic was totally dry. I didn't have any other ink. I also heard that Copic pens don't smear, but I don't have any. So I ended up laminating the stamped circles before adhering them to the bottlecap. I know, total overkill. But it worked and the ink/color stayed true.

My husband then punched holes in the bottlecaps using a nail and a hammer. You could certainly use a drill bit, but we didn't have one small enough. Add the jump rings to the holes in the bottlecaps and string your cord/string through. You are now done!


To personalize them a little bit, I added another jump ring to the bottom and a different colored flower charm to each. My daughter got to pick which color went to which friend. She really enjoyed that. 

The dimensional magic really gives these a nice shine and cover. You can't really see that from the photos. They were a fun item to add to the girl's birthday goodie bags! Now I want to experiment with other inks and markers. It's got to be easier than laminating the circles. These would also be cute with just pretty patterned paper in the middle. No need to worry about ink and pencils.

There you have it, bottlecap necklaces. Thanks for stopping by today!